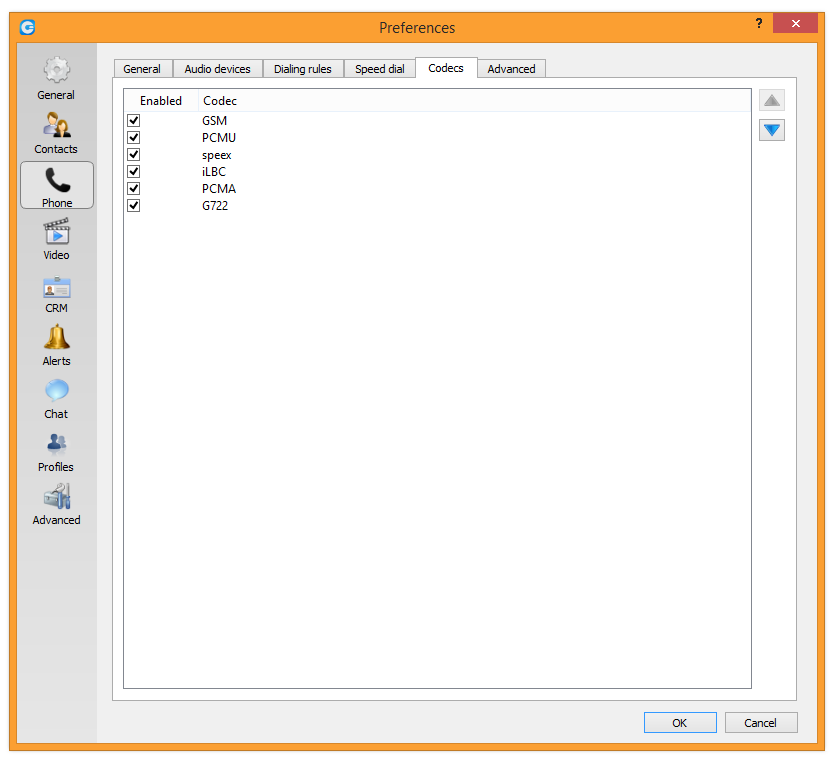
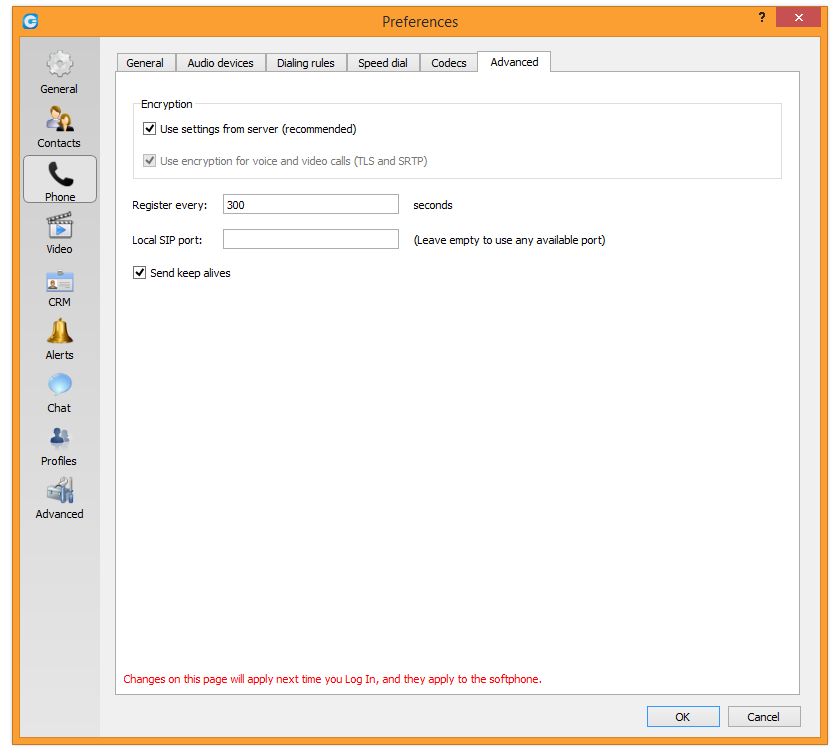
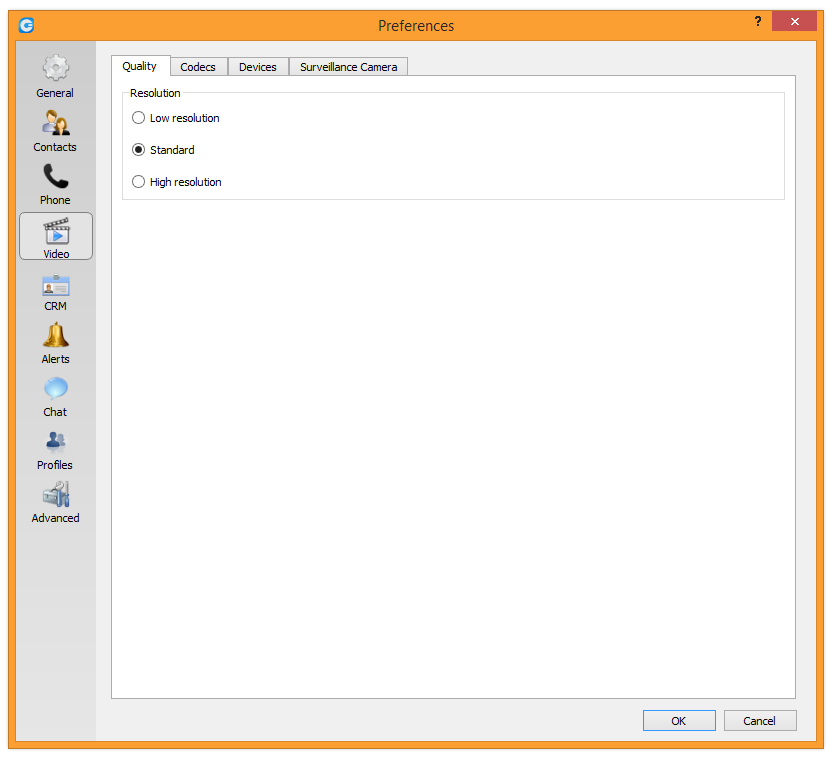
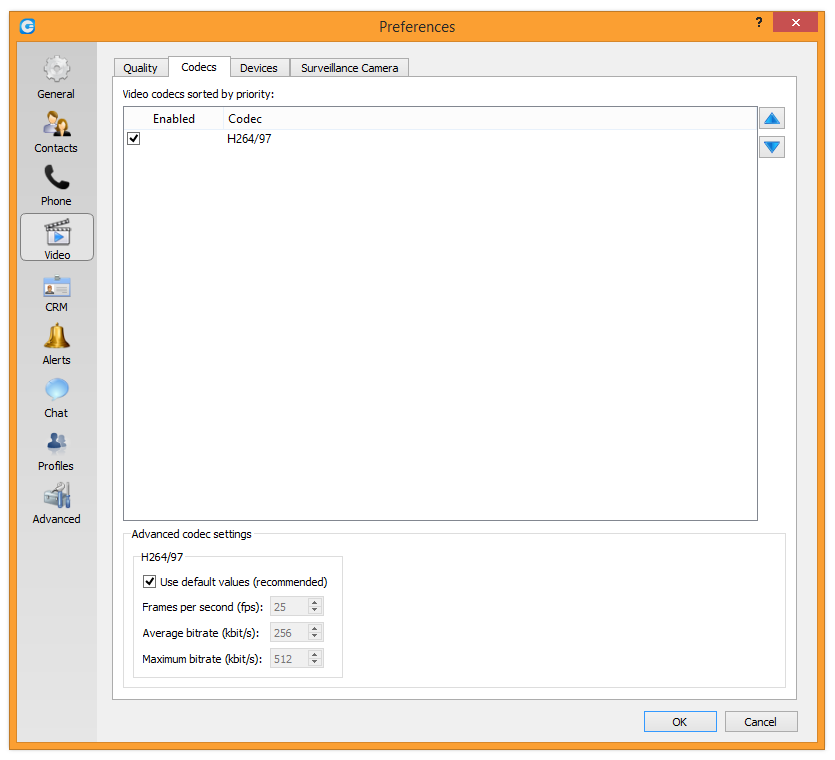
Table of Contents
InstallationConfiguring VoIPOffice CommunicatorWorking with VoIPOffice CommunicatorLog InToolbarDestinations and VoIPOffice Communicator ModulesPlacing Phone CallsPhonePhoneVoice ConferenceChat in a GroupVoicemailAgent panelAgentsQueuesChannelsPlacing Video CallsSending FaxVideo WindowCameraOnline self careQuick ListMenuFile MenuViewTools MenuContacts MenuHelpPreferencesGeneralGeneralGeneralContacts1. General2. Google3. OutlookPhonePhoneGeneralGeneralGeneralAudio devicesDialing RulesSpeed dialCodecsCodecsAdvancedVideoQualityCodecsCodecsDevicesSurveillance CameraCRM1. CRMPopup optionsAuthenticationLogging options2. Call PopupAlertsGeneralGeneralGeneralNotificationsSoundsChatProfilesAdvancedInstallation
 Welcome screen
Please download VoIPOffice Communicator 4.1 from our official website www.telappliant.com
After the download is finished, click on the icon to start the installation.
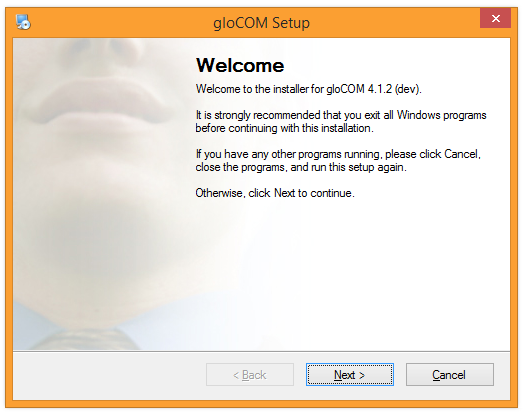
The welcome window starts the installation process. Click on the Next button to proceed with the installation or click on the Cancel button to exit the installation wizard.
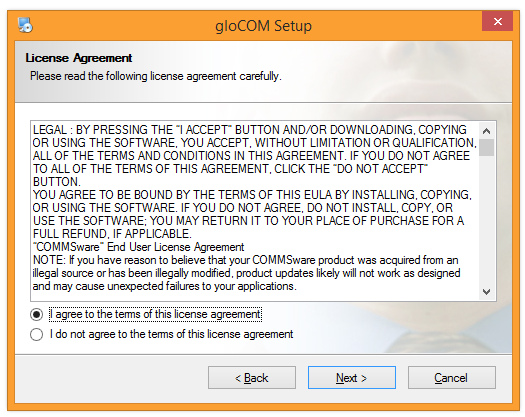
Read the license agreement and select 'I agree' if you accept the License Agreement. Click on the Next button to proceed with the installation or click on the Cancel button to exit the installation wizard.
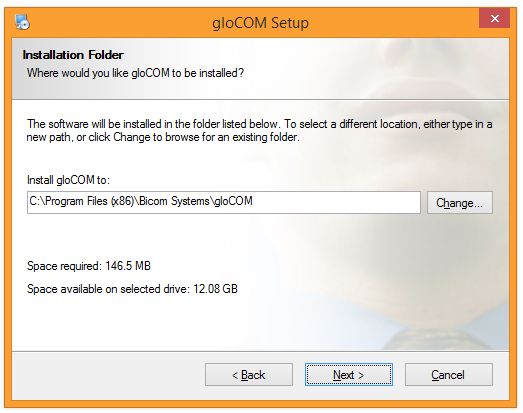
The Installation Folder window sets the default location where the VoIPOffice Communicator installation will reside. By default C:\Program Files\Telappliant\VoIPOffice Communicator is offered. To select a different location, click on the Change button. When done, click on the Next button to proceed with the installation or click on the Cancel button to exit the installation wizard.
The Shortcut Folder window sets how the VoIPOffice Communicator shortcut will be displayed on the Windows Start menu. Select the preferred shortcut under the Shortcut Folder select box and click on the Next button to proceed with the installation, or click on the Cancel button to exit the installation wizard.
The Ready-to-Install window summarizes the Installation wizard steps and displays all of the selected options. If you agree with these, click on the Next button to proceed with the installation or click on the Cancel button to exit the installation wizard.
The 'Installing VoIPOffice Communicator' window shows the installation in progress. It takes about 20 seconds to install VoIPOffice Communicator files on a machine with a Windows XP operating system, Pentium CPU 3.0 GHz, and 1GB of RAM.
After this step, you'll see the 'Installation Successful' window. Click on the Finish button to close the window and finish the installation.
Configuring VoIPOffice Communicator
 Browser integration
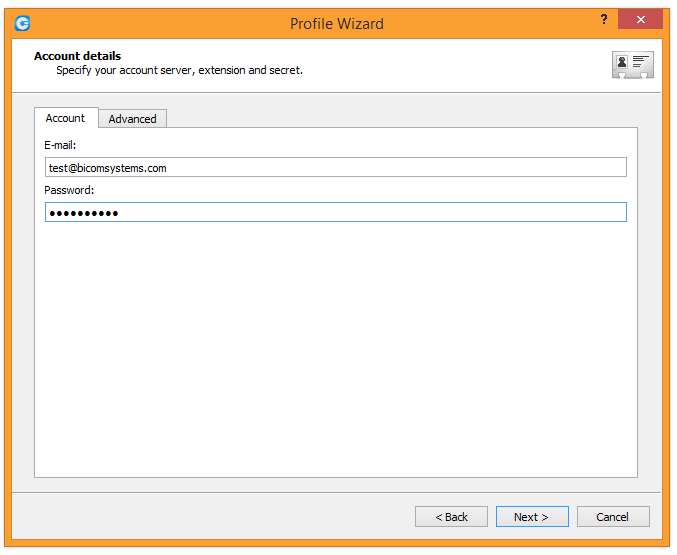 Account Details
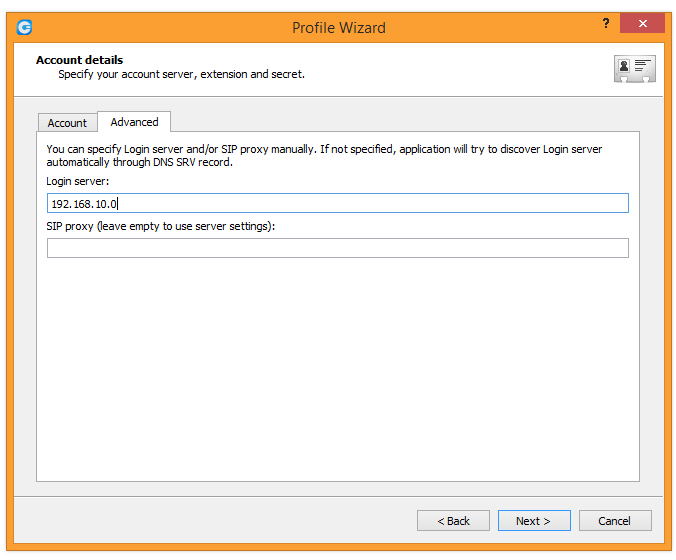 Advanced
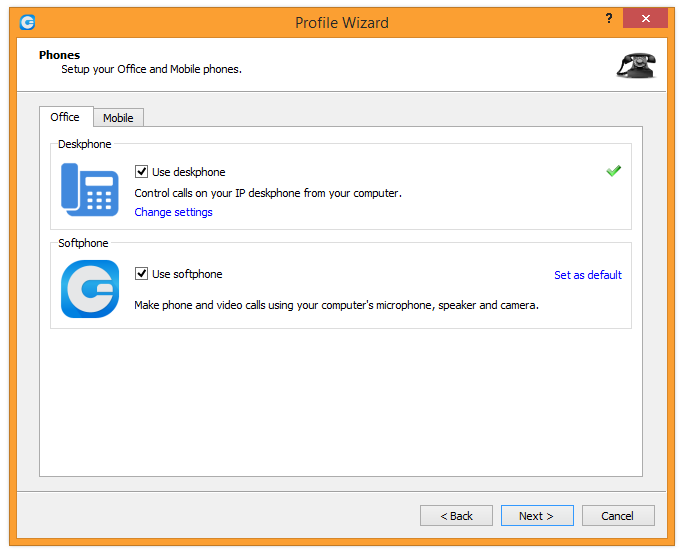 Phones
After the installation process, you need to configure VoIPOffice Communicator. Click on the VoIPOffice Communicator icon and the Profile wizard will appear. To continue with the configuration click the Next button.
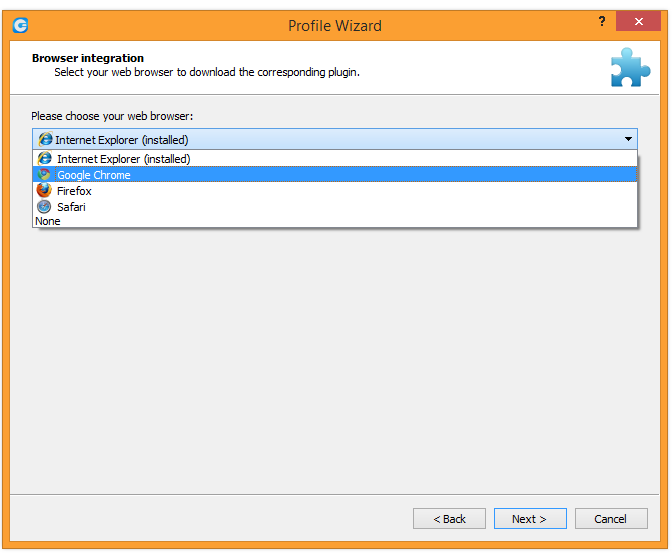
1. Browser integration
- Select your preferred web browser to download the corresponding plugin. Once you finish with the configuration, the browser will open automatically, directing you to the plugin download page.
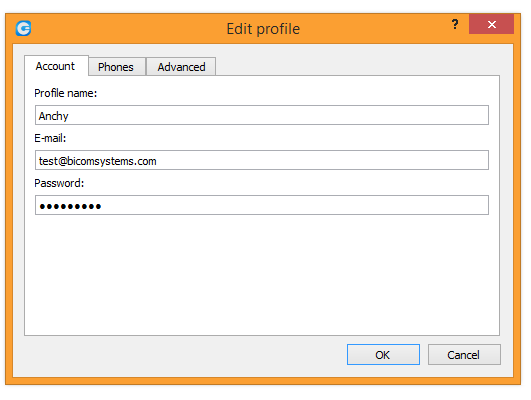
2. Account details
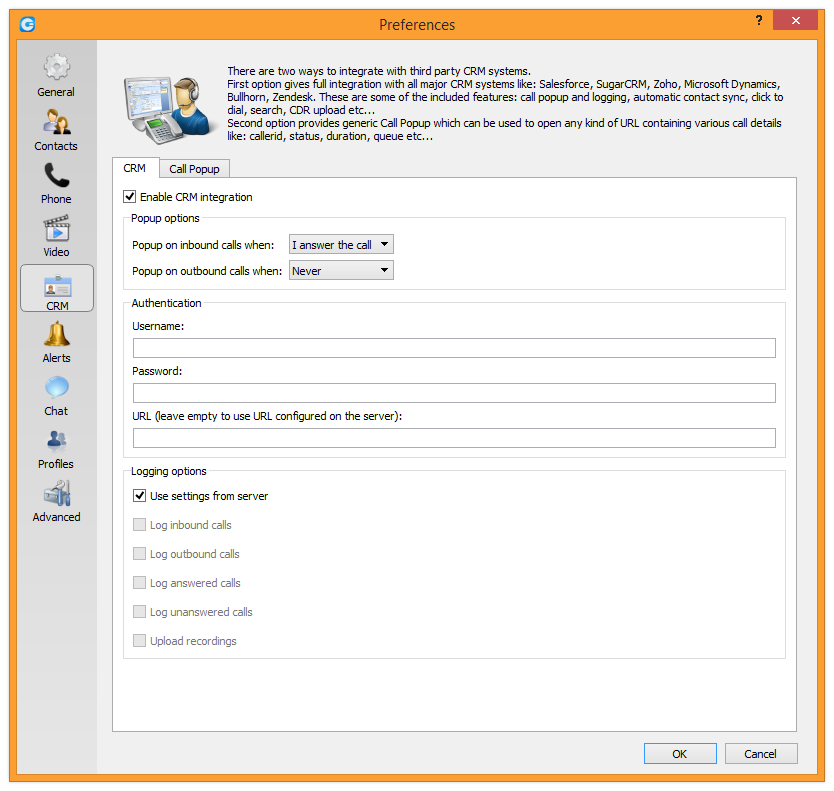
- Make sure you have received your account details from your system administrator or account manager. The received details must include:
- Account
- - E-mail, for example: example@telappliant.com
- - User password, for example: 93sU2e_2%
- Advanced
- - Server address, for example: voip.telappliant.com or 134.23.211.23
- - SIP proxy (leave empty to use server settings)
- NOTE: In VoIPOffice Communicator 4.1, instead of an extension and secret, users will provide their e-mail assocciated with extension and User password.
After you click Next, VoIPOffice Communicator will try to connect to the specified server with the user's account details. If the account details are wrong, a red warning will appear. Otherwise, a Change Password pop-up window will appear telling you to change your password since this is the first time you are logging in. Your password has to be at least 8 characters and 85% secure. Users are required to change this password on login and once changed it is hashed and unknown for all administrators of the system.
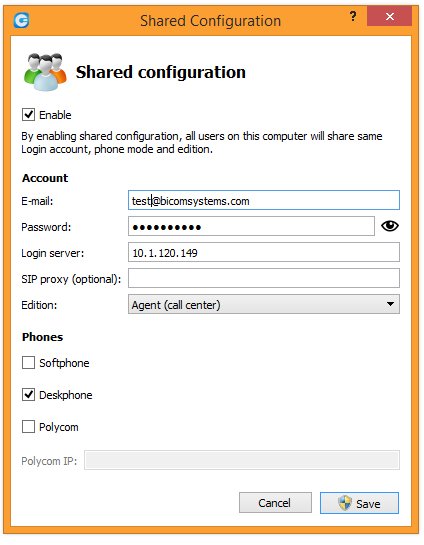
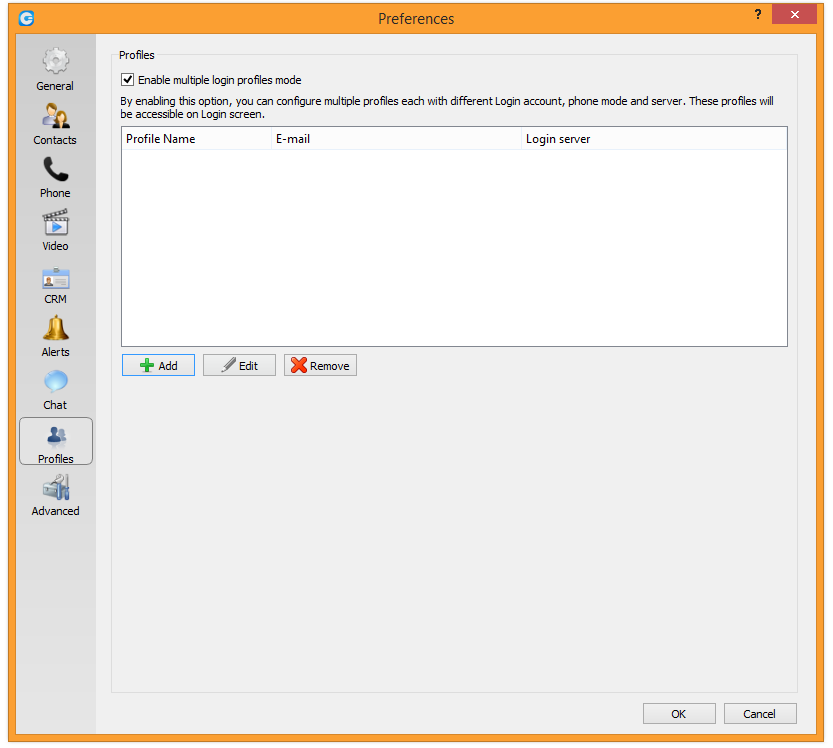
3. VoIPOffice Communicator edition
- Select VoIPOffice Communicator edition. You may choose between Office, Business, Agent (Call Center), or Supervisor (Call Center).
4. Setup office and mobile phone
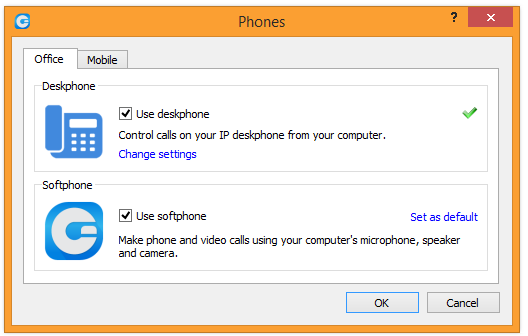
- Setup your Office phones. If you choose softphone, you will be able to place and receive calls using your computer. If you choose desk phone, you can control calls on your IP desk phone from your computer. Selecting the checkboxes for both desk phone and softphone will allow users to switch between devices when initiating a call and also to pick which device they would like to answer incoming calls on.
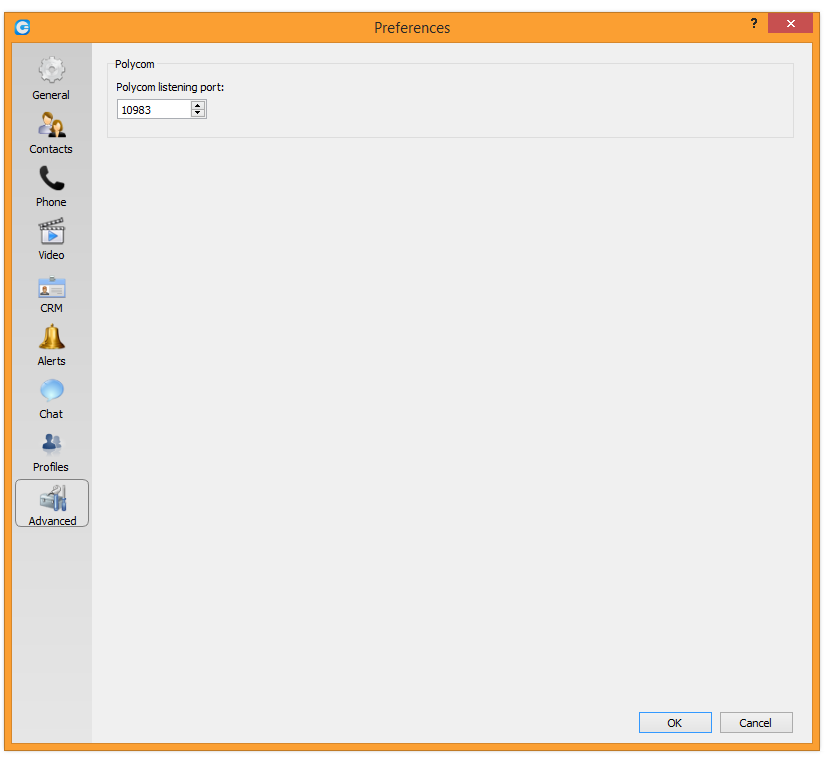
- NOTE: If you use Polycom phones, click on 'My desk phone is Polycom'. Provide the phone's IP address and click Configure. This will help VoIPOffice Communicator to identify and configure Polycom phones.
- In VoIPOffice Communicator 4.1, users can assign Mobile Numbers that they would like to receive calls on when not at their desk. Click the Mobile tab and click + icon to add Mobile phone number and it’s label.
Click Next and a configuration summary window will appear. Please check the profile details and make sure they are correct. Click Finish and you will be automatically logged in with your account. Now you are ready to use VoIPOffice Communicator with all its features.
Working with VoIPOffice Communicator
Log In
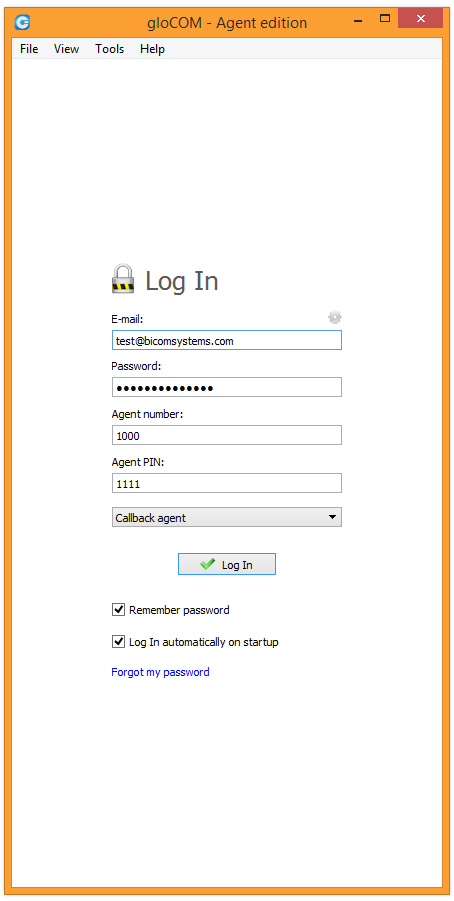 Log In
- E-mail:
- Provide the e-mail address that is assigned to your extension.
- Password:
- Enter the password that you created during the VoIPOffice Communicator configuration.
- Agent number:
- Enter the agent number.
- Agent PIN:
- Enter the agent PIN number.
- Callback agent/Dynamic agent:
- Choose if you want to log in as callback or dynamic agent.
- Remember password
- Check if you want VoIPOffice Communicator to save your password.
- Log In automatically on startup
- When this option is turned on, VoIPOffice Communicator will log in automatically. Every time VoIPOffice Communicator is started, it will automatically log in.
- Forgot my password
- If a user forgets his password, he can recover it by clicking the ‘Forgot my Password’ link. The user will receive a password recovery link via email.
Toolbar
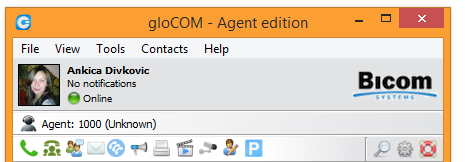 Communicator Toolbar
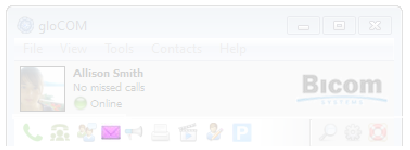
- User image
- A user-defined image that is displayed on the user's profile.
- You can change your avatar image by clicking on your current avatar and a new window will appear with avatar settings. Browse for the image from your computer and set the preferred image options.
- VoIPOffice Communicator now supports higher resolution avatars, allowing users to set up any resolution between 256x256 and 512x512 pixels
- Username
- User defined name which is shown in your chat conversations.
- Missed Calls
- Displays any missed calls or reads No Missed Calls.
- Status and Status Message
- If left-clicked, a menu will open. The user will be able to choose his availability: Online, Busy, Do not Disturb, Away, and/or Offline. In My Settings -> Status, users can set their personal messages or news and upload their profile picture.
- Agent available on ext:
- Name, number and type of agent is displayed. For example, Agent: Agent Smith (Nr: 100, Callback)
- Pause agent:
- Put an agent on pause.
 Communicator Toolbar
- Phone
- Opens a softphone window next to the VoIPOffice Communicator main window.
- Voice Conference
- Opens a Voice conference window next to the VoIPOffice Communicator main window.
- Group Chat
- Opens a Group Chat window next to the VoIPOffice Communicator main window.
- Voicemail
- Opens a Voicemail window next to the VoIPOffice Communicator main window.
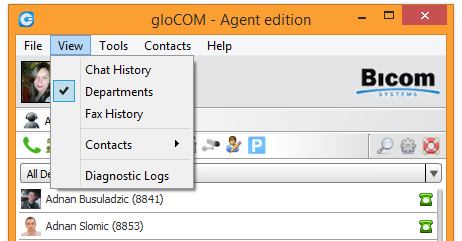
- Agent panel
- In agent panel user can choose what he/she wants to display on panel, such as: all agents, all queues or alerts.
- Channels
- Opens a 'Channels' window next to the VoIPOffice Communicator main window.
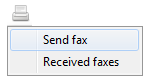
- Fax
- Offers the choice to send a fax or view received faxes. Based on your choice, an additional window will open next to VoIPOffice Communicator.
- Camera Preview
- Opens the webcam preview window.
- Surveillance Camera
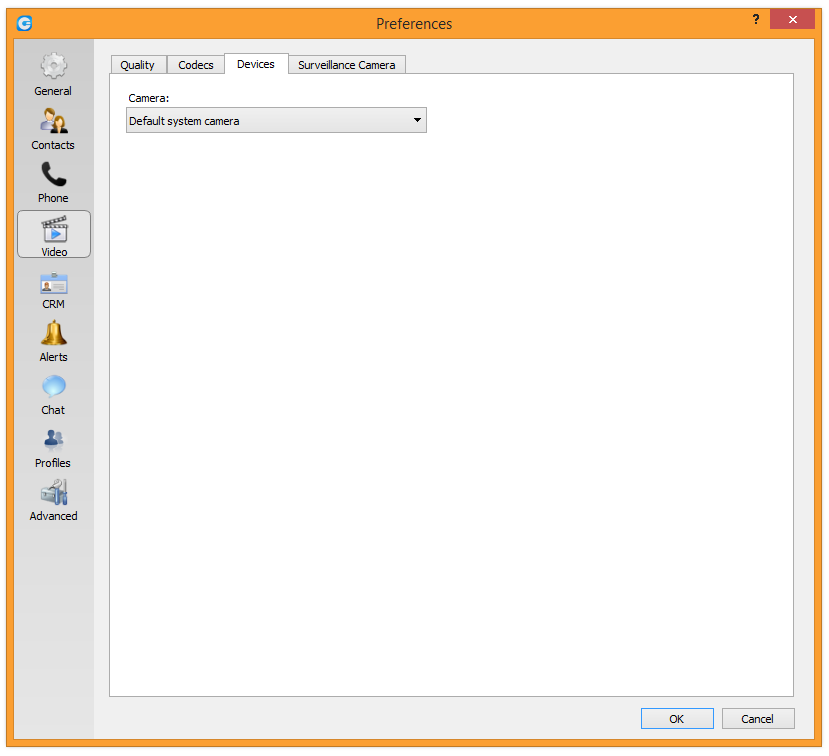
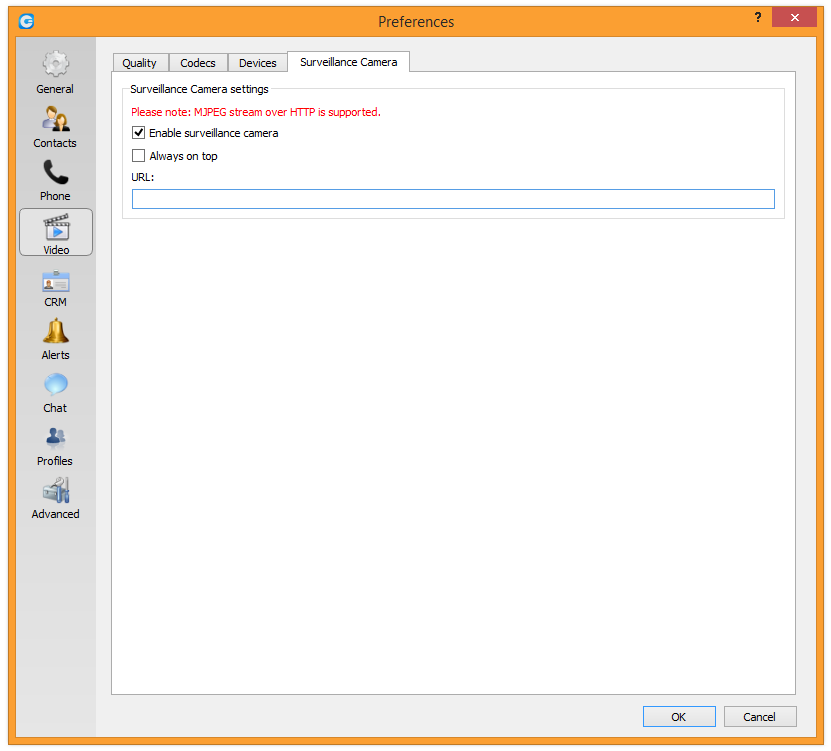
- Opens up a Surveillance Camera preview. This option will work only if you have your surveillance camera set up on the IP address in Tools --> Preferences --> Video --> Surveillance Camera.
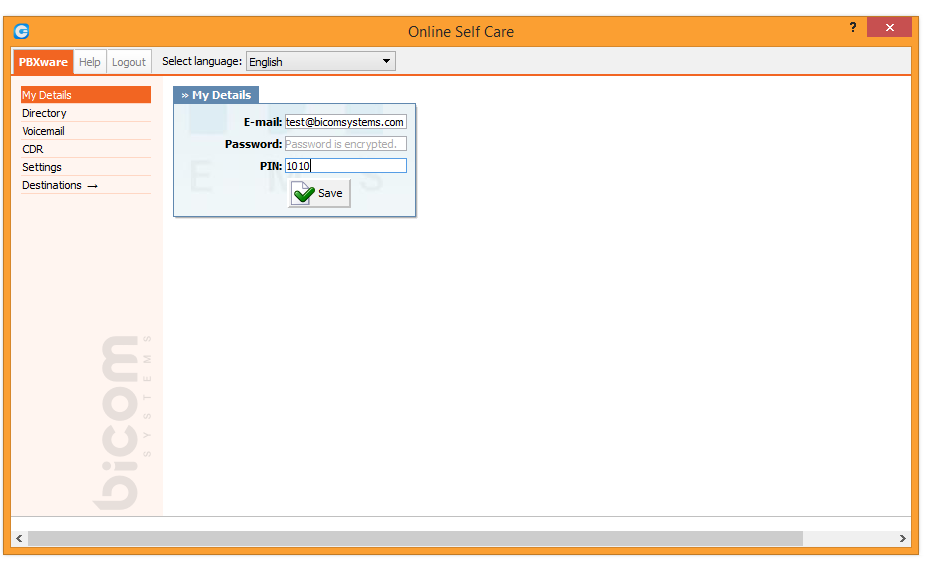
- Online self care
- In order to login to Online Self Care, point your browser to: http://$IPADDRESS/ (For Example: http://192.168.1.1/)
-
- Email: The email address assigned to the extension
- (ex. The provided email address is used as a username for logging into Online Self Care
- (e.g. email@example.com))
- ([a-z] [0-9] [@_.-])
-
- Password/PIN: The PIN assigned to the extension
- (ex. This field accepts the extension's PIN (e.g.1981))
- ([0-9])
- Parked calls:
- Once a call is parked, it can be picked up by anyone at any location by dialing the parked extension.
- Search
- Opens a Search panel below the toolbar. Type the name of the contact that you wish to locate in the search panel.
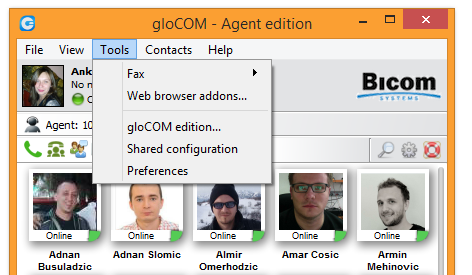
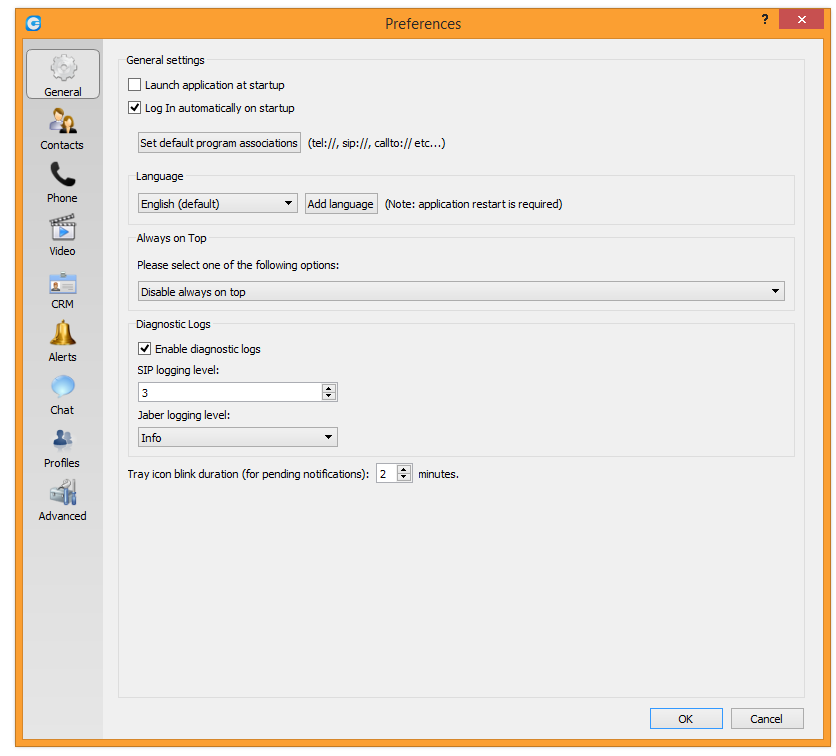
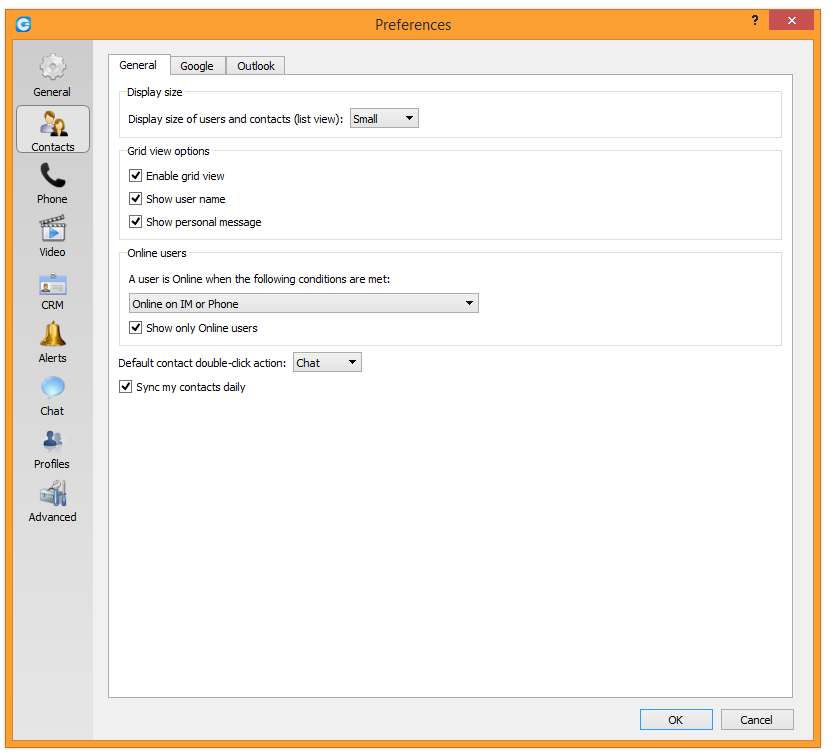
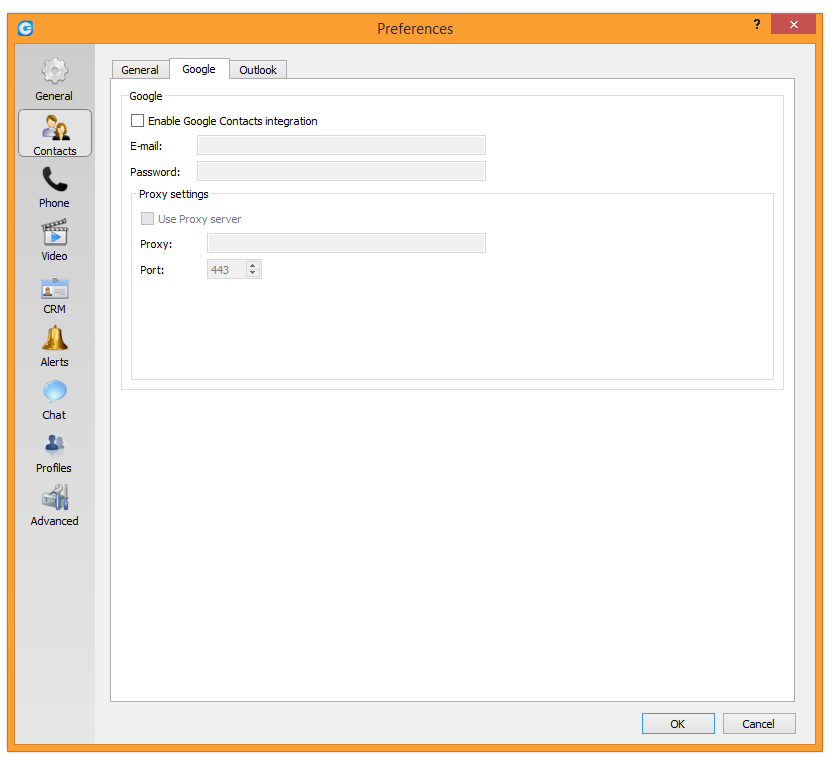
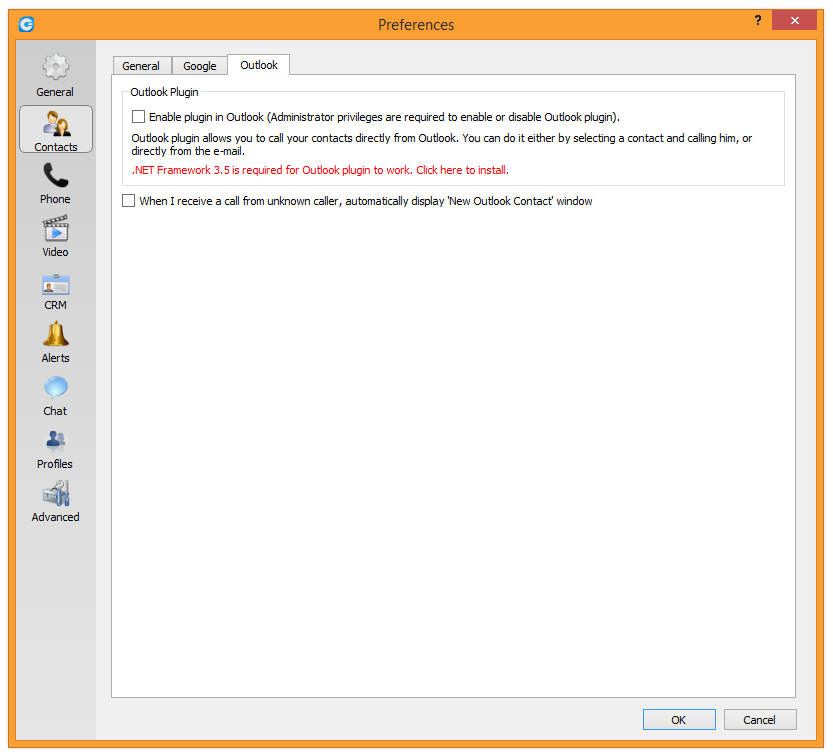
- Settings
- Opens a Preferences window. Refer to the Preferences chapter for detailed instructions.
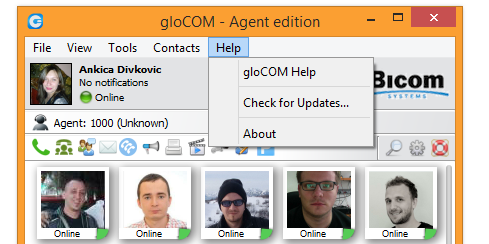
- Help
- Redirects to our official website: www.telappliant.com. Additional documentation and guides are available on our official website www.telappliant.com If you still have any questions, please feel free to contact our support department.
Destinations and VoIPOffice Communicator Modules
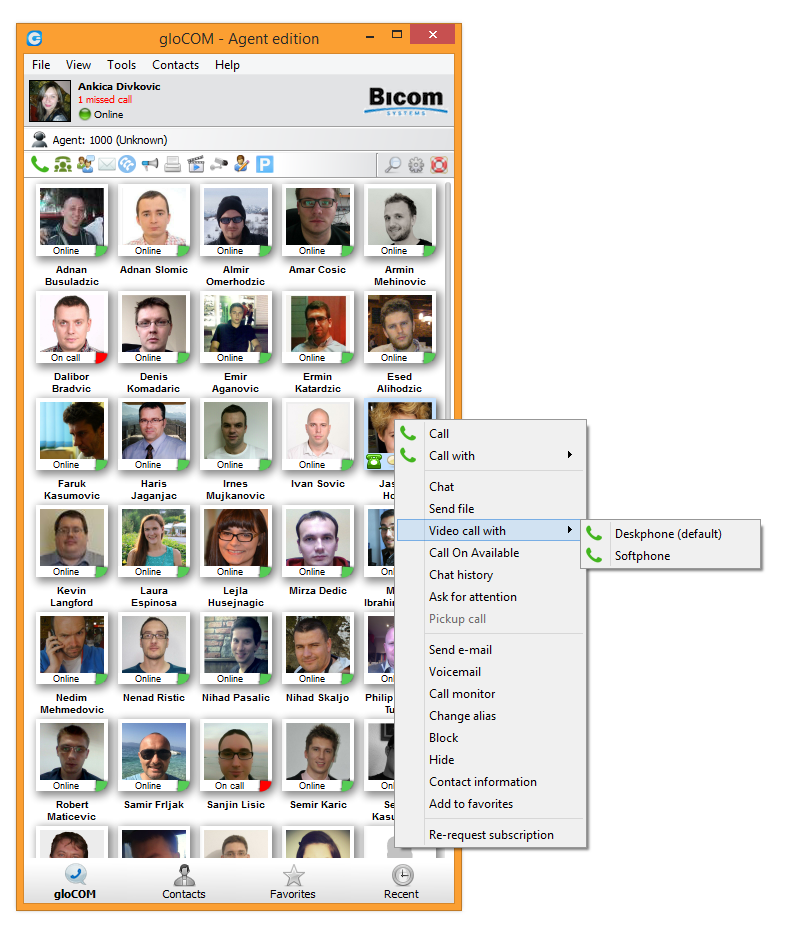
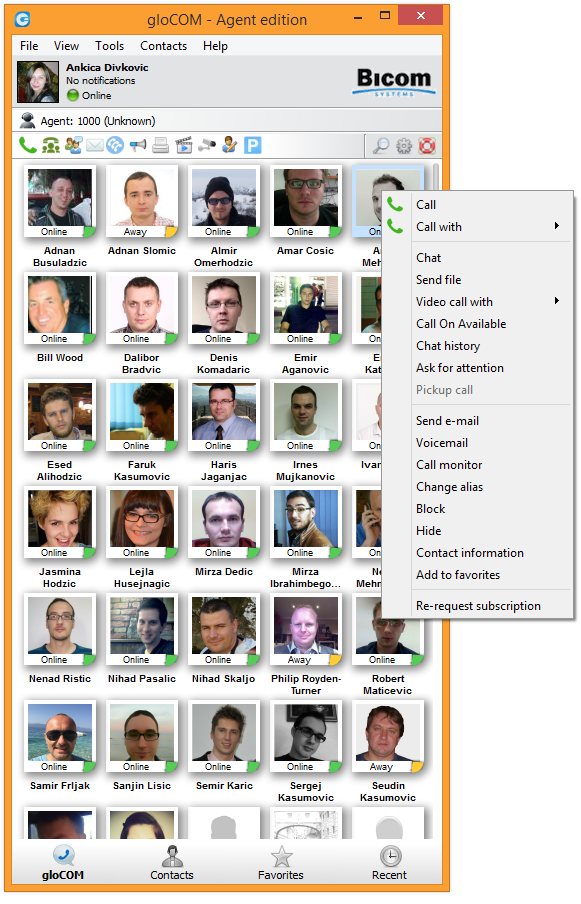 Right Click
VoIPOffice Communicator can place a call to any system destination, for example: extensions, queues, conferences, voicemail, system calls, or parking. Calls can be placed with a drag-and-drop motion from one extension to another, or directly from the phone display to the extension, for example. Right clicking on a contact name offers more possible actions regarding the selected extension.
This way the user can:
- - Make a call from VoIPOffice Communicator
- - Make a Video Call from VoIPOffice Communicator
- - Chat with the selected contact
- - Send an email to a contact
- - Block the selected contact
- - Call the selected contact On Available
- - Check Voicemail
- - Monitor calls
- - Add the selected contact to 'Favorites'
- - See more information about the contact
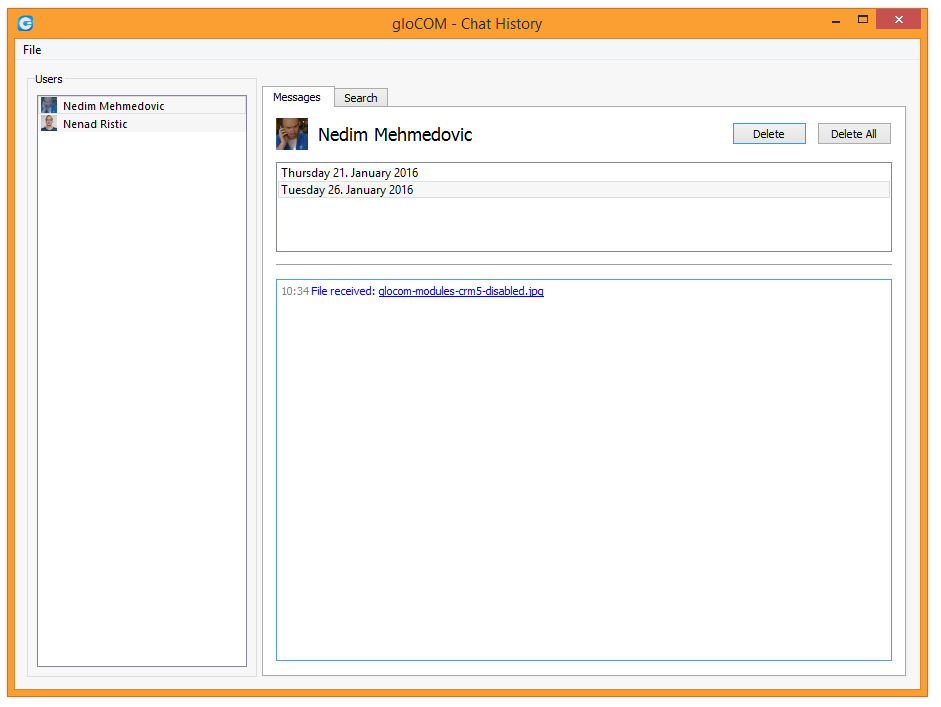
- - See a chat history with the selected contact
- - Re-request subscription
Placing Phone Calls
1. Open Phone module
- Click on the Phone module icon to show the Phone module.
2. Dial entering the phone number
- Use the Phone module dial keypad or keys on your keyboard to enter the phone number you want to dial.
- Click on the Dial icon to place a call.
3. Dial with Drag and Drop
- With your mouse click and hold any contact from the contact list, then drag the selected contact from the VoIPOffice Communicator list to the phone module area, and Release (Drop) the contact.
- Click the Dial button to place a call.
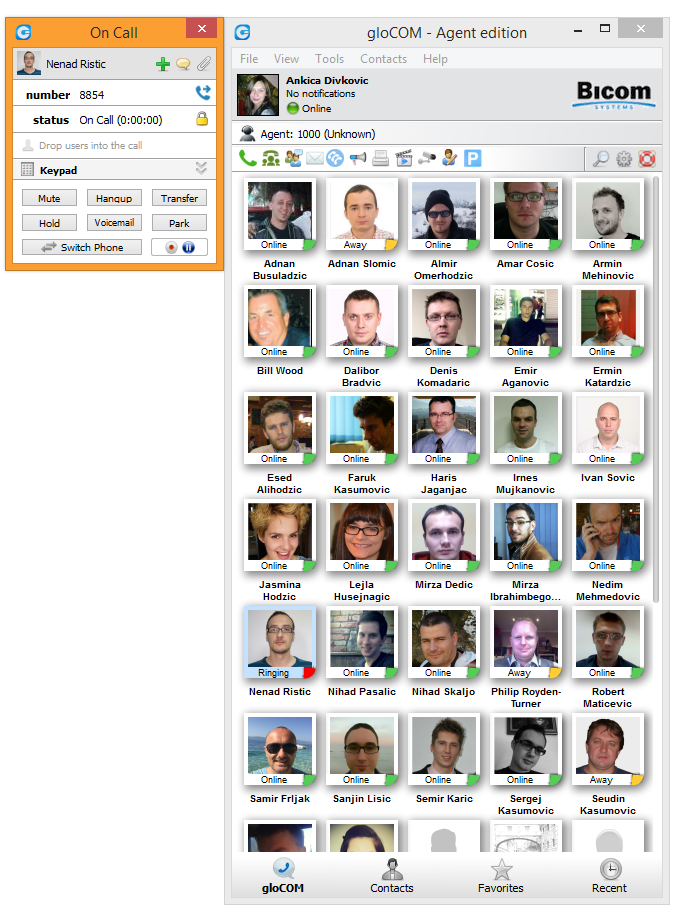
Live call
4. Transfer options:
- Blind/transfer to a phone number: Type in some number (i.e. mobile phone) and transfer the call to it.
- Transfer to another ongoing call: If a user has 2 or more active calls, he can transfer the calls from one to another. One simple scenario is: A VoIPOffice Communicator user is talking to John Doe. He receives a call from Allison Smith while speaking to John Doe. The VoIPOffice Communicator user is now able to add Allison Smith to the existing call with John Doe and all 3 participants will now hear each other.
5. Switch phone
- During a live call, you can use the Switch Phone button to initiate ringing across all registered devices so the user to continue the call on another device. A perfect example would be switching from your desk phone to your mobile when you need to leave your office but would like to continue your call.
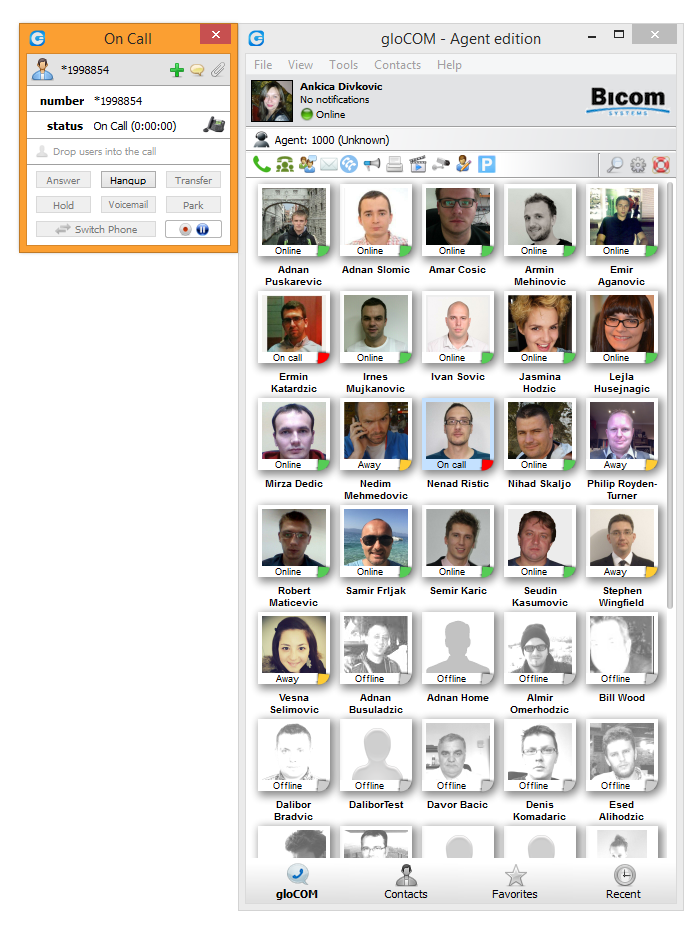 Call Monitoring
6. Call Monitor
If your administrator enables Call Monitor on your extension in VoIPOffice Enhanced Services, you will be able to listen to any call in real time. When a call is placed, right click on the user that is on call and choose Call Monitor. You can escalate from silent monitoring to “barging in” to speaking with all parties.
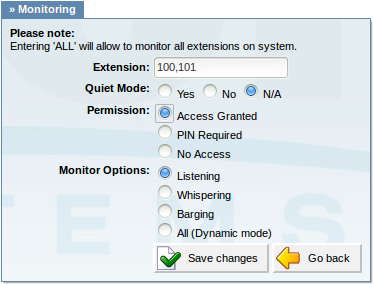 Call Monitoring
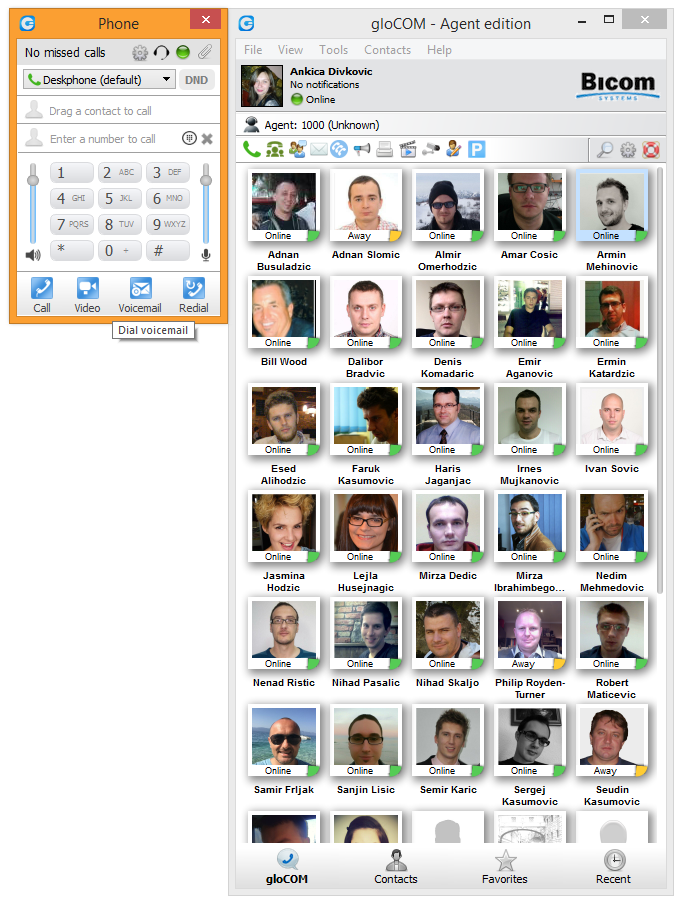
Phone
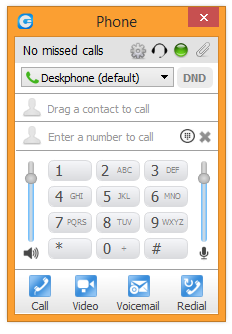
The phone module area where information about possible missed calls is shown.
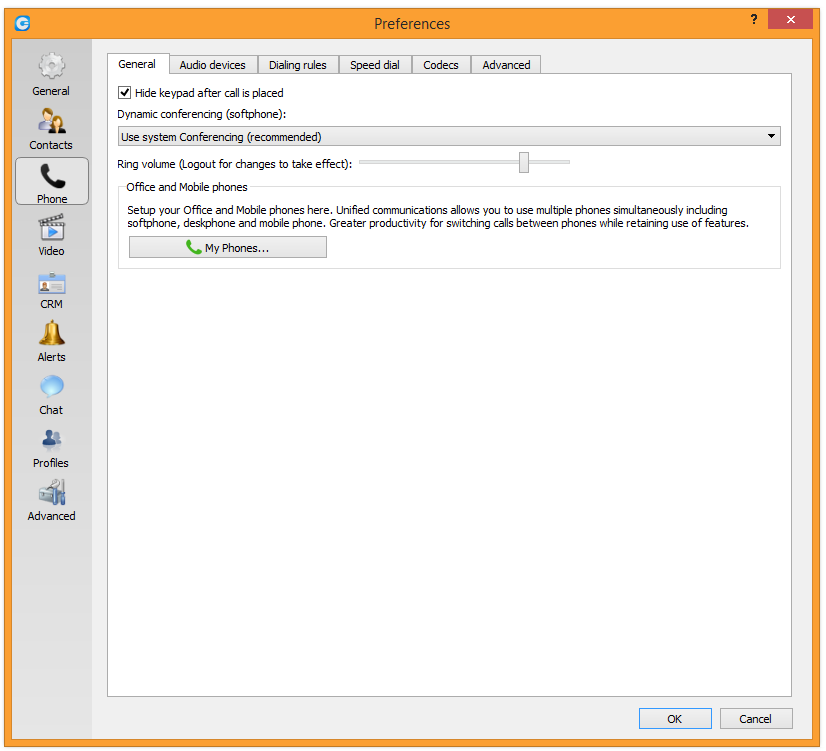
- From the phone module you can set up office and mobile phones by clicking the settings icon next to missed calls information.
- Select your audio device by clicking the headset icon. It points to the Preferences->Phone->Audio devices section where you can choose which Input, Output, and Ringtone device to use.
- A green (or eventually red) circle shows the Phone module connection status. If green is shown, the Phone module is connected and the user can place calls. If a red circle is shown, the Phone module is not connected and the user is unable to place a call, in which case the user should contact their system administrator.
- The attachment sign is used to attach the phone module to the VoIPOffice window.
- In the Phone module you can see which phone mode is set by default. If you have selected both modes, click on the dropdown menu and switch to another mode. Next to this dropdown there is a DND icon with the option to set your status to Do Not Disturb.
- Phone module area where a contact is shown after the Drag-and-Drop action.
- Phone module area where a dialed contact's phone number is shown.
- Speaker volume tuner. Adjust the speaker volume by moving the slider up or down. Do not increase volume more than needed because it can induce hearing loss.
- Microphone volume tuner. Adjust the microphone volume by moving the slider up or down.
- Phone module dial keypad. Used for entering phone numbers.
![]() - When a phone number is entered, click on the Call button to place a call.
- When a phone number is entered, click on the Call button to place a call.
![]() - When a phone number is entered, click on the Video button to start a Video call.
- When a phone number is entered, click on the Video button to start a Video call.
![]() - When a new Voicemail message is available, this button will flash.
- When a new Voicemail message is available, this button will flash.
- Click on the Voicemail button to check your voicemail.
![]() - Click on the Redial button to redial the last dialed contact or phone number.
- Click on the Redial button to redial the last dialed contact or phone number.
Voice Conference
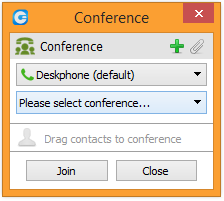 Voice Conference
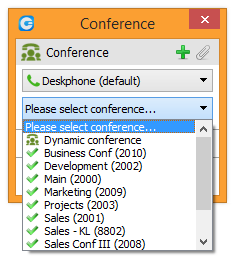 Voice Conference
 Conference Call
- Group Chat module area where the name of the module is shown.
- Plus sign used to invite a contact using his landline or mobile number.
- The attachment sign is used to attach the phone module to the VoIPOffice window.
- Select a box to choose from a conference room

 Drag Contact
- The Voice Conference module area where a contact is shown after Drag-and-Drop.
- To remove a contact from a Chat Group, click

- Click on
 button to start the Voice Conference.
 - Click on
 to close the Voice Conference.
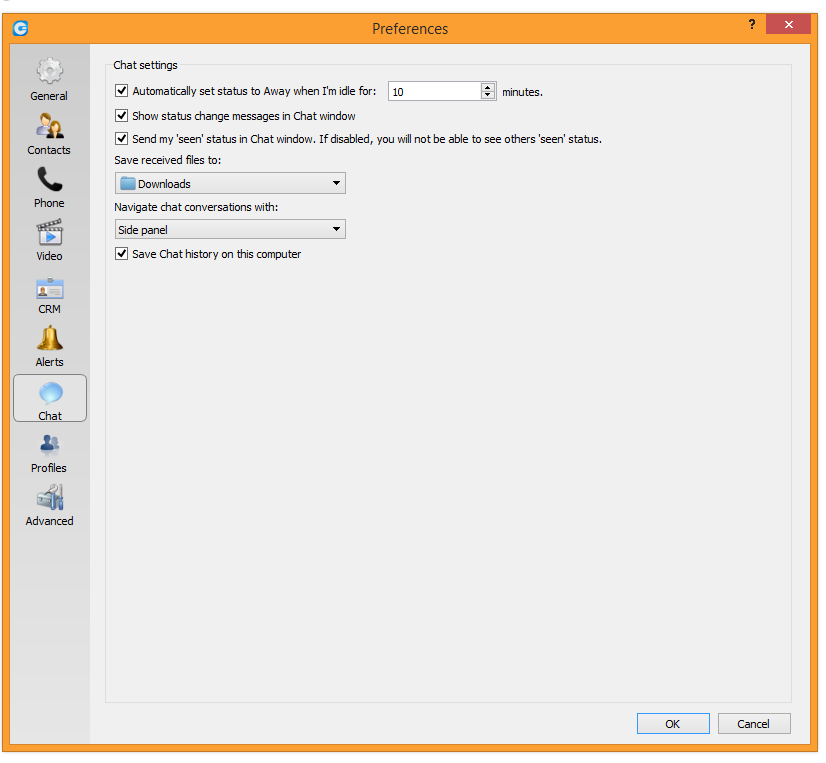
Chat in a Group
 Group Chat
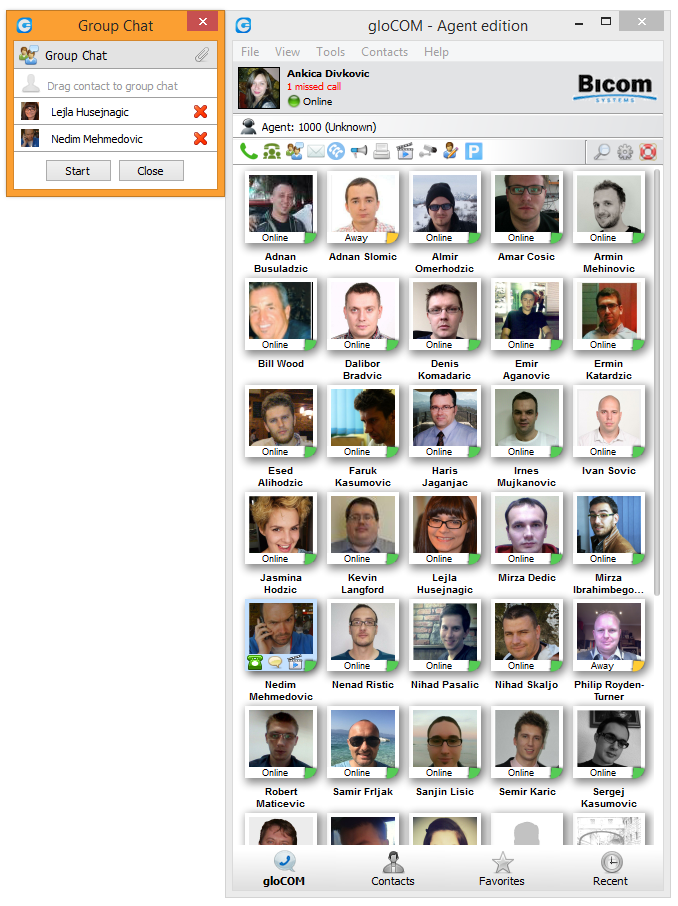
1. Open Group Chat module
- Click on Group Chat module icon to show Group Chat module.
2. Group Chat with Drag and Drop
- With your mouse click and hold any contact from the contact list, then drag the selected contact from the VoIPOffice Communicator list to the Group Chat module area, and Release (Drop) the contact. Repeat this action to Drag-and-Drop more contacts into the Group Chat.
- Click on the Start button to start a Group Chat with the selected contacts.
 Group Chat
- Group Chat module area where the name of the module is shown.
- Attachment sign is used to attach phone module to VoIPOffice window.
 Drag and Drop
- Group Chat module area where contact is shown after Drag and Drop action.
- To remove a contact from the Chat Group, click on

- Click
 to start the Group Chat.
 - Click
 to close the Chat Group window and stop the Group Chat.
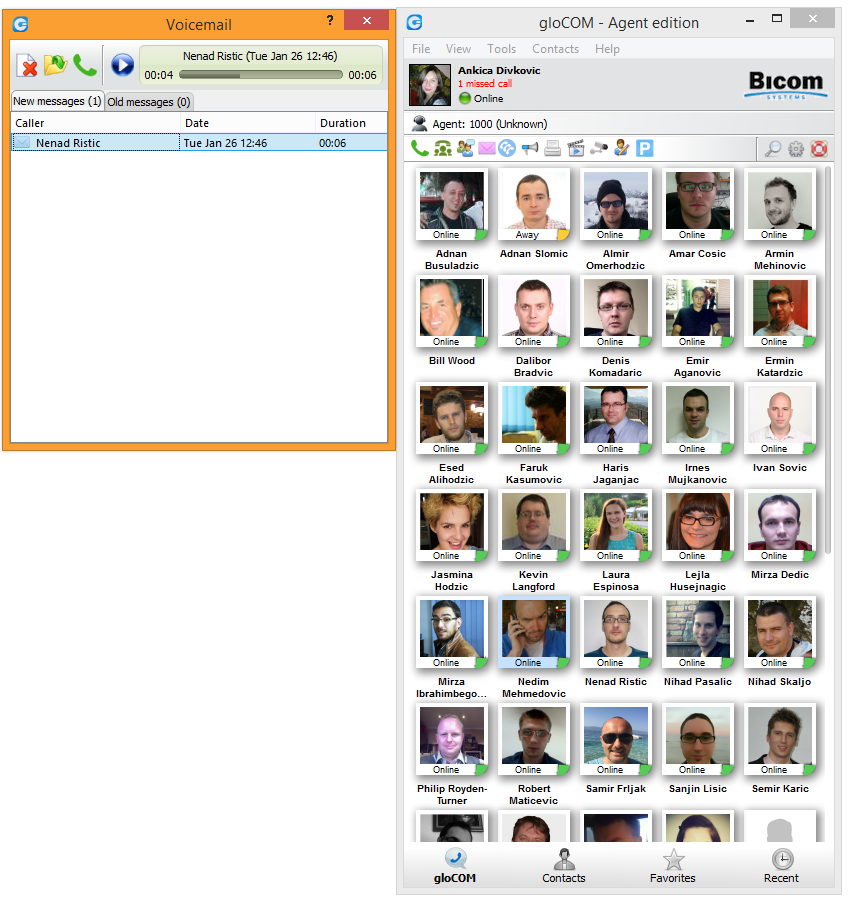
Voicemail
- Click
 to place a call to a contact who left a voicemail message.
 Voicemail
- Click
 to play the selected voicemail message.
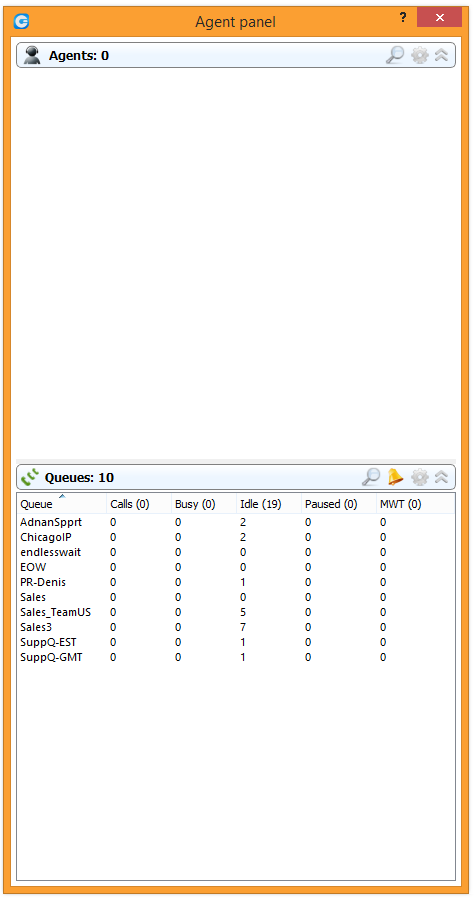
Agent panel
Agents
- Search agents:
- Search can be based on agent's number or name.
Settings
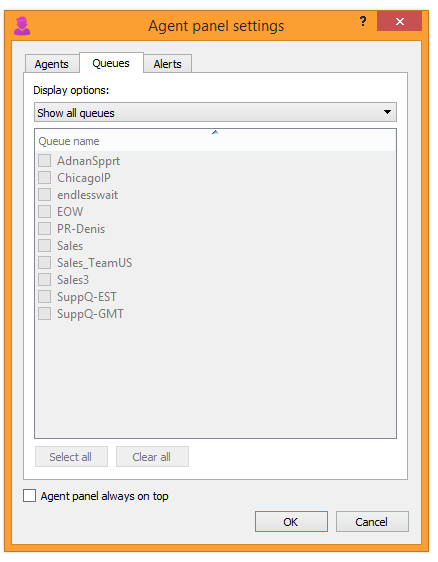
1. Agents:
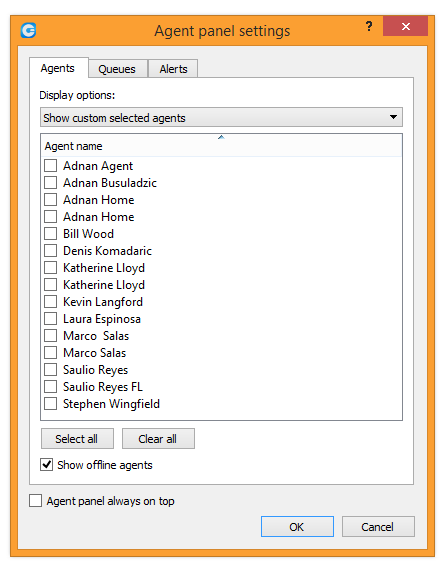 Agent Panel Settings
- From drop down list, user can select the following options:
- Show only agents from my queues
- Show all agents
- Show custom selected agents
- Show offline agents:
- Click on check box for this option in case you want to see offline agents.
- Agent panel always on top:
- Click on check box for this option in case you want to set the agent panel always on top.
2. Queues
- The following display options are offered:
- Show my queues only
- Show all queues
- Show custom selected queues
- Agent panel always on top:
- You will use this option in case you want to set agent panel always on top.
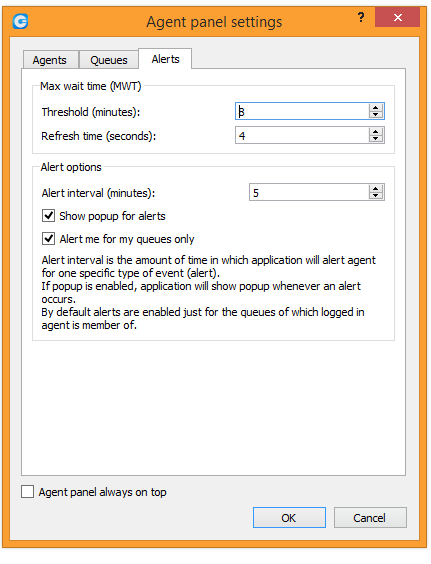
3. Alerts
- Max wait time (MWT)
- Threshold (minutes): Select or enter the number which will represent Threshold in minutes.
- Refresh time (seconds):
- Select or enter the number which will represent Refresh interval in seconds.
- Alert options
- Alert interval (minutes):
- Select or enter the number which will represent interval in minutes after which alert will repeat.
- Show popup for alerts
- Click on check box if you want to show popup for alerts.
- Alert me for my queues only
- Click on check box if you want to receive alerts only for agent's queues.
- Agent panel always on top
- Click on check box for this option in case you want to set agent panel always on top.
Queues
- Search queues:
- Search queue based on queue number or queue name.
- Alerts:
- Clicking on "Alert" option, list of alerts is displayed. Here you can delete alerts, or change already configured options for alerts in Settings section.
- Settings:
- This option is same as Agent Settings.
Hide Agents/Queues
- This option is used if you want to see only one of the Agent or Queue section. For example, in case you want to display only Agents, you will click on "Hide Queues" option.
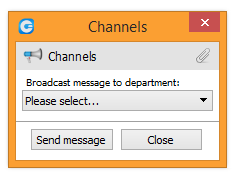
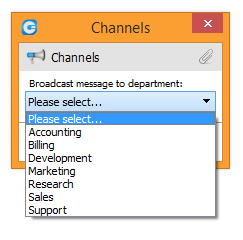
Channels
- Channels module area where the name of module is shown.
- The attachment sign is used to attach the phone module to the VoIPOffice window.
- Click to choose a department to which the user wants to send a message.
- Click to open a Channels message window.
- Click
 to close the Channels module window and stop the Channels conversation.
|
Placing Video CallsTo place a video call, right click on a VoIPOffice Communicator contact and select Video Call from the drop-down menu. |
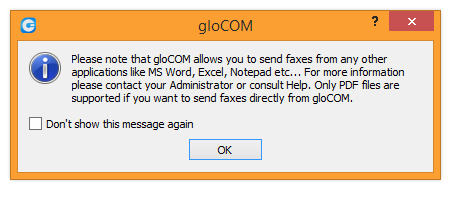
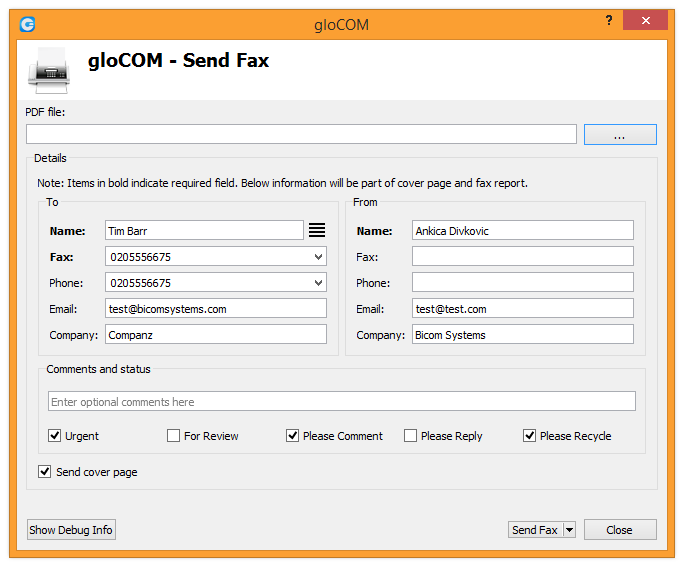
Sending Fax
|
1. Outgoing faxes
PDF file:
Information that you enter in the Send FAX wizard will be displayed on the FAX cover page if you choose to send a cover page. In the Send Fax window you can see two sections, To and From. To Section
From Section
Additional information like comments and status can be entered also.
Video Window
Opens the webcam preview window.
Camera
Opens up a Surveillance Camera preview. This option will work only if you have your surveillance camera set up in the IP address in VoIPOffice Communicator --> Preferences --> Video --> Surveillance Camera.
Online self care
Quick ListQuick list buttons enable a quick overview of VoIPOffice Communicator, Contacts, Favorites, and Recent tabs.
MenuFile Menu
|

