IVR stands for Interactive Voice Response also known as an auto attendant.
When you call a company and hear a message like "Thank you for calling. Press 1 for sales, 2 for support and 3 for accounts", this is an IVR. The vocal prompts direct your call to the relevant department.
Prerequisites
To complete this task you will need access to your VoIPOffice web interface. You will need to know the administration email address and login password in order to log in. You will also need to know the domain of your VoIPOffice. All these details were provided in the original welcome pack email the account holder received from Telappliant.
Creating a new IVR
- Log on to your VoIPOffice. Once logged on to your VoIPOffice, follow these steps to create a new IVR.
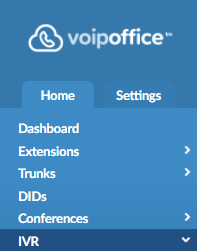
- Click on 'IVR' in the navigation menu on the left hand side.
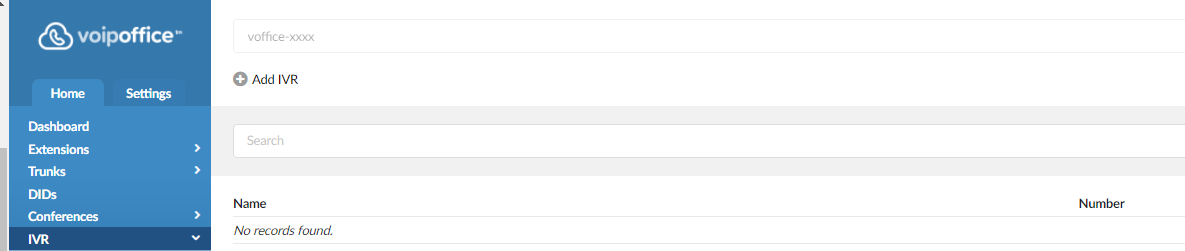
- Click on the Add IVR button above the list of available IVRs.
- On the IVR: Edit page, enter a name for the IVR and a unique number that will be dialled to access the IVR. The next available number is automatically shown but often ranges of numbers are allocated to a specific purpose (all IVRs start 5xxx for example) so you can manually change the default value if needed.
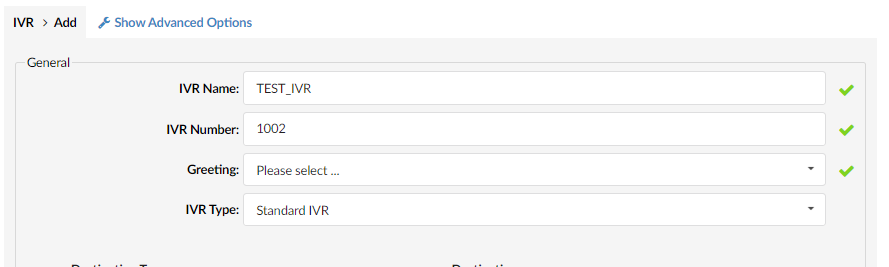
- If you have already recorded a greeting for this IVR you can select it otherwise select 'default-attendant-greeting' from the drop down list. Details on how to record a greeting can be found in the article called 'How to replace the recorded greeting for a VoIPOffice IVR or Queue'.
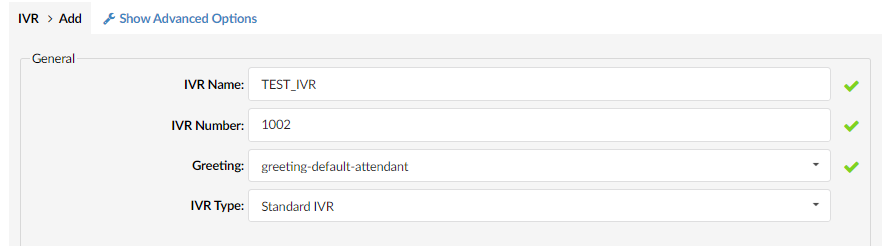
- Leave the IVR Type as 'Standard IVR'.
You cannot save the new IVR until at least one destination has been configured.
Configuring the options within an IVR
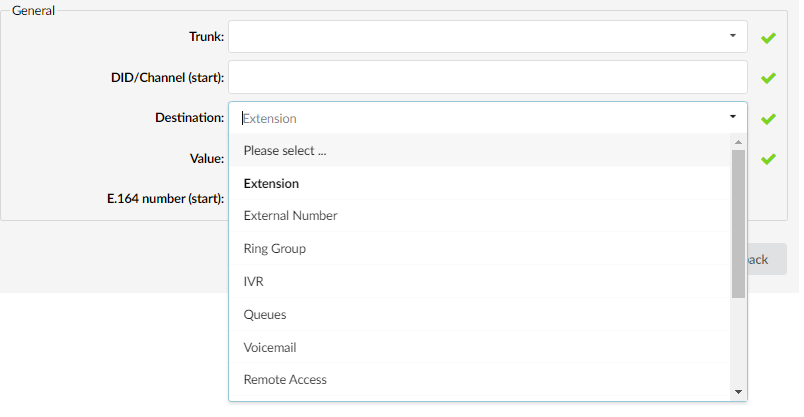
The destination for each option can be any existing object on the VoIPOffice such as an extension (including ring groups), a queue, a conference room or another IVR. There are several alternative options including sending the call to an external number.
In this article we will provide the example of setting up a basic IVR with two options; one for Sales and another for Support. The Sales team uses a ring group whereas the Support group uses a queue.
You must already know the numbers associated with any destination that you plan to use as there is no lookup capability. Queues however are listed using their name.
- A ring group is classed as an extension, select Extension from the Destination drop down list next to option 1.
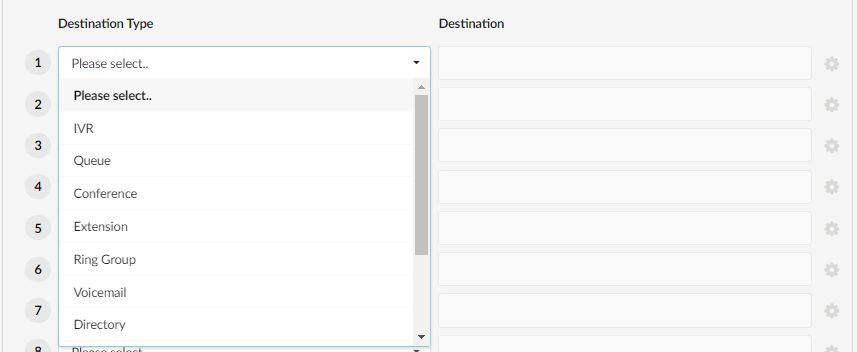
- Enter the number for the ring group in the destination field. In our example this will be 1000.

- Now to add the second option for Support, select Queue from the Destination drop down list next to option 2.

- Select the name of the queue from the drop down list that is now available in the destination column.
- Click the Save button to finish adding this new IVR.
Associating the new IVR
In order for callers to be directed to the new IVR, it must be associated in some way. You can link one IVR to another, it could be linked from a queue but more commonly it is associated with a DID (or incoming) number.
To continue to associate this new IVR with a incoming number that is already present on the VoIPOffice:
- Click on 'DIDs' in the navigation menu on the left hand side.
- Click on the edit button beside the DID you wish to update.

- Select 'IVR' as the Destination and enter the number of the IVR in to the Value field. Then click the Save button.