The instructions below detail how to configure the following VoIP devices for use with the VoIPtalk SIP service:
- Grandstream Budgetone 101
- Grandstream Budgetone 102
- Grandstream Handytone ATA-286
- Grandstream Handytone ATA-386
- Grandstream Handytone ATA-486
- Grandstream Handytone ATA-488
- Grandstream Handytone ATA-496
- Grandstream Handytone ATA-502
ATTENTION: Update the firmware of your Grandstream device to the recommended firmware version.
WARNING: When booting the phone for the first time, please allow for 3-5 minutes booting time as the phone might be automatically downloading and installing a new version of the firmware.
- Plug your Grandstream into the LAN and obtain the phone's IP Address as follows: Budgetone users press MENU then the DOWN arrow and MENU again. The phone's IP Address should appear on the phone's screen.
Handytone users (Handytone must be plugged into the LAN and connected to an analogue phone) press the button on the Handytone, you should hear a menu prompt announcement on your analogue phone. Dial 02 and you should hear the IP Address.
- Type the web address into a web browser on a local PC. DO NOT include any leading zeros, so 192.168.001.010 should actually be typed: http://192.168.1.10 into your web browser. You should see the following login screen:
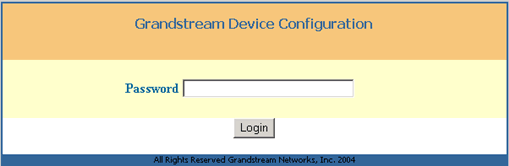
- Type in the default password admin and press Login. The configuration page should appear.
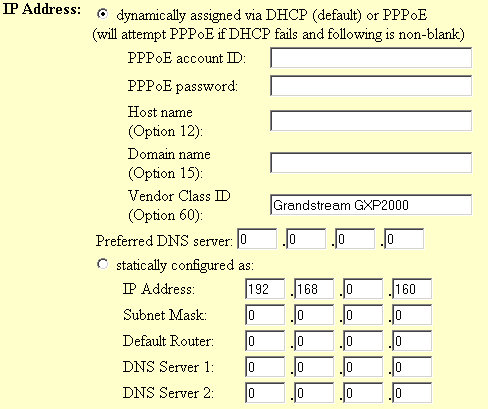
- Select dynamically assigned via DHCP from the items below:
- Set Admin Password to a personal value. This value will change the default admin that was used to access the phone menu in step 2 above. This is not a mandatory step but we do recommend that you change the password.
- Set SIP User ID and Authenticate ID equal to your VoIPtalk User ID, SIP Server equal to voiptalk.org and Authenticate Password equal to your VoIPtalk password, as shown below. To retrieve your VoIPtalk password go to your account page and click on your VoIPtalk ID.
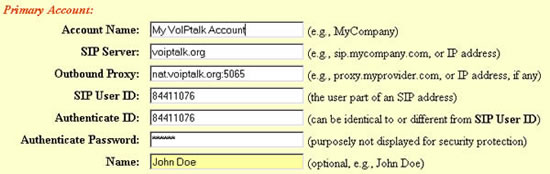
- Set your IP Phone number equal to your VoIPtalk ID.

- Configure your SIP Registration settings as shown below:

- If your IP Phone is behind NAT (i.e. your phone has an internal address and shares the router with other IP devices) you must configure STUN as shown below: Note: You should not configure STUN if you have a public fixed IP address for your IP Phone

- Set DTMF info to be transported via SIP Info as shown below:

- Click UPDATE at the bottom of the configuration page then click to view your changes and then click the REBOOT on the phone menu screen. Make sure you click UPDATE before clicking REBOOT to make sure your changes are implemented correctly.
- Upon rebooting, your phone should have connected to the VoIPtalk service. To test this dial 902. You should hear a confirmation message played back to you.

